April 30, 2024

Needle Cleaning Day

I’ve been playing catch-up what with finally getting the SMC1 working. I finished the SMC3 mechanism and installed it in the SMC1. Lo and behold it picked up A/B sides one after the other as it is supposed to. As a reminder the other mech would not play both sides of the same record. Now the juke will with the SMC3 mechanism so I confirmed that the problem was indeed in the mechanism. The beauty of spare parts. And then I proceeded to overthink the problem as I usually do. It’s a good way to learn as I pored over schematics, troubleshooting guides, broke out the meter, ohmed every wire to death…..

I found nothing and finally turned back to the vertical stack of switches. I compared them with the ones on the SMC3 mech and looked at the adjustments. The bottom pair, 1M1 and 1M2, reverse the motor when going from left to right side play when both sides of the same record are selected. The motor was reversing before the mechanism could mechanically switch the tonearm assembly to the right side. It was a matter of adjusting them again, using the SMC3 mechanism as a guide. I had done it according to the book and it just wouldn’t work. The gap needed to be a lot bigger than what Seeburg says.

Now I have a working SMC1 and am at the point of testing. I go out every day and play several records looking for problems to crop up. The ones that did lately are like the tone arm would not land in the play-in space. No matter where I put the Pickup 1 adjustment the tonearm was being jerked forward a bit landing in the music. I had to perform the rest of the Pickup Adjustments 2 through 5 to fix that and then back to 1 to get a good landing spot. Today, most of the time the record clamp won’t clamp flat against the record. When it does this it causes the record to wobble and you can definitely hear a warble. A bad warble that sounds like the speed is off. I did the adjustments for it several times. Most people want to blame the spring but you can add a double-strength spring and it won’t help if the adjustments aren’t right. I will replace the clamp shaft tomorrow. Actually pull it out and put it in the other way. When I loosen the set screw and adjust the horizontal position the clamp works fine until I tighten the set screw. I think the set screw is falling into its old mark instead of setting up a few thousandths away.

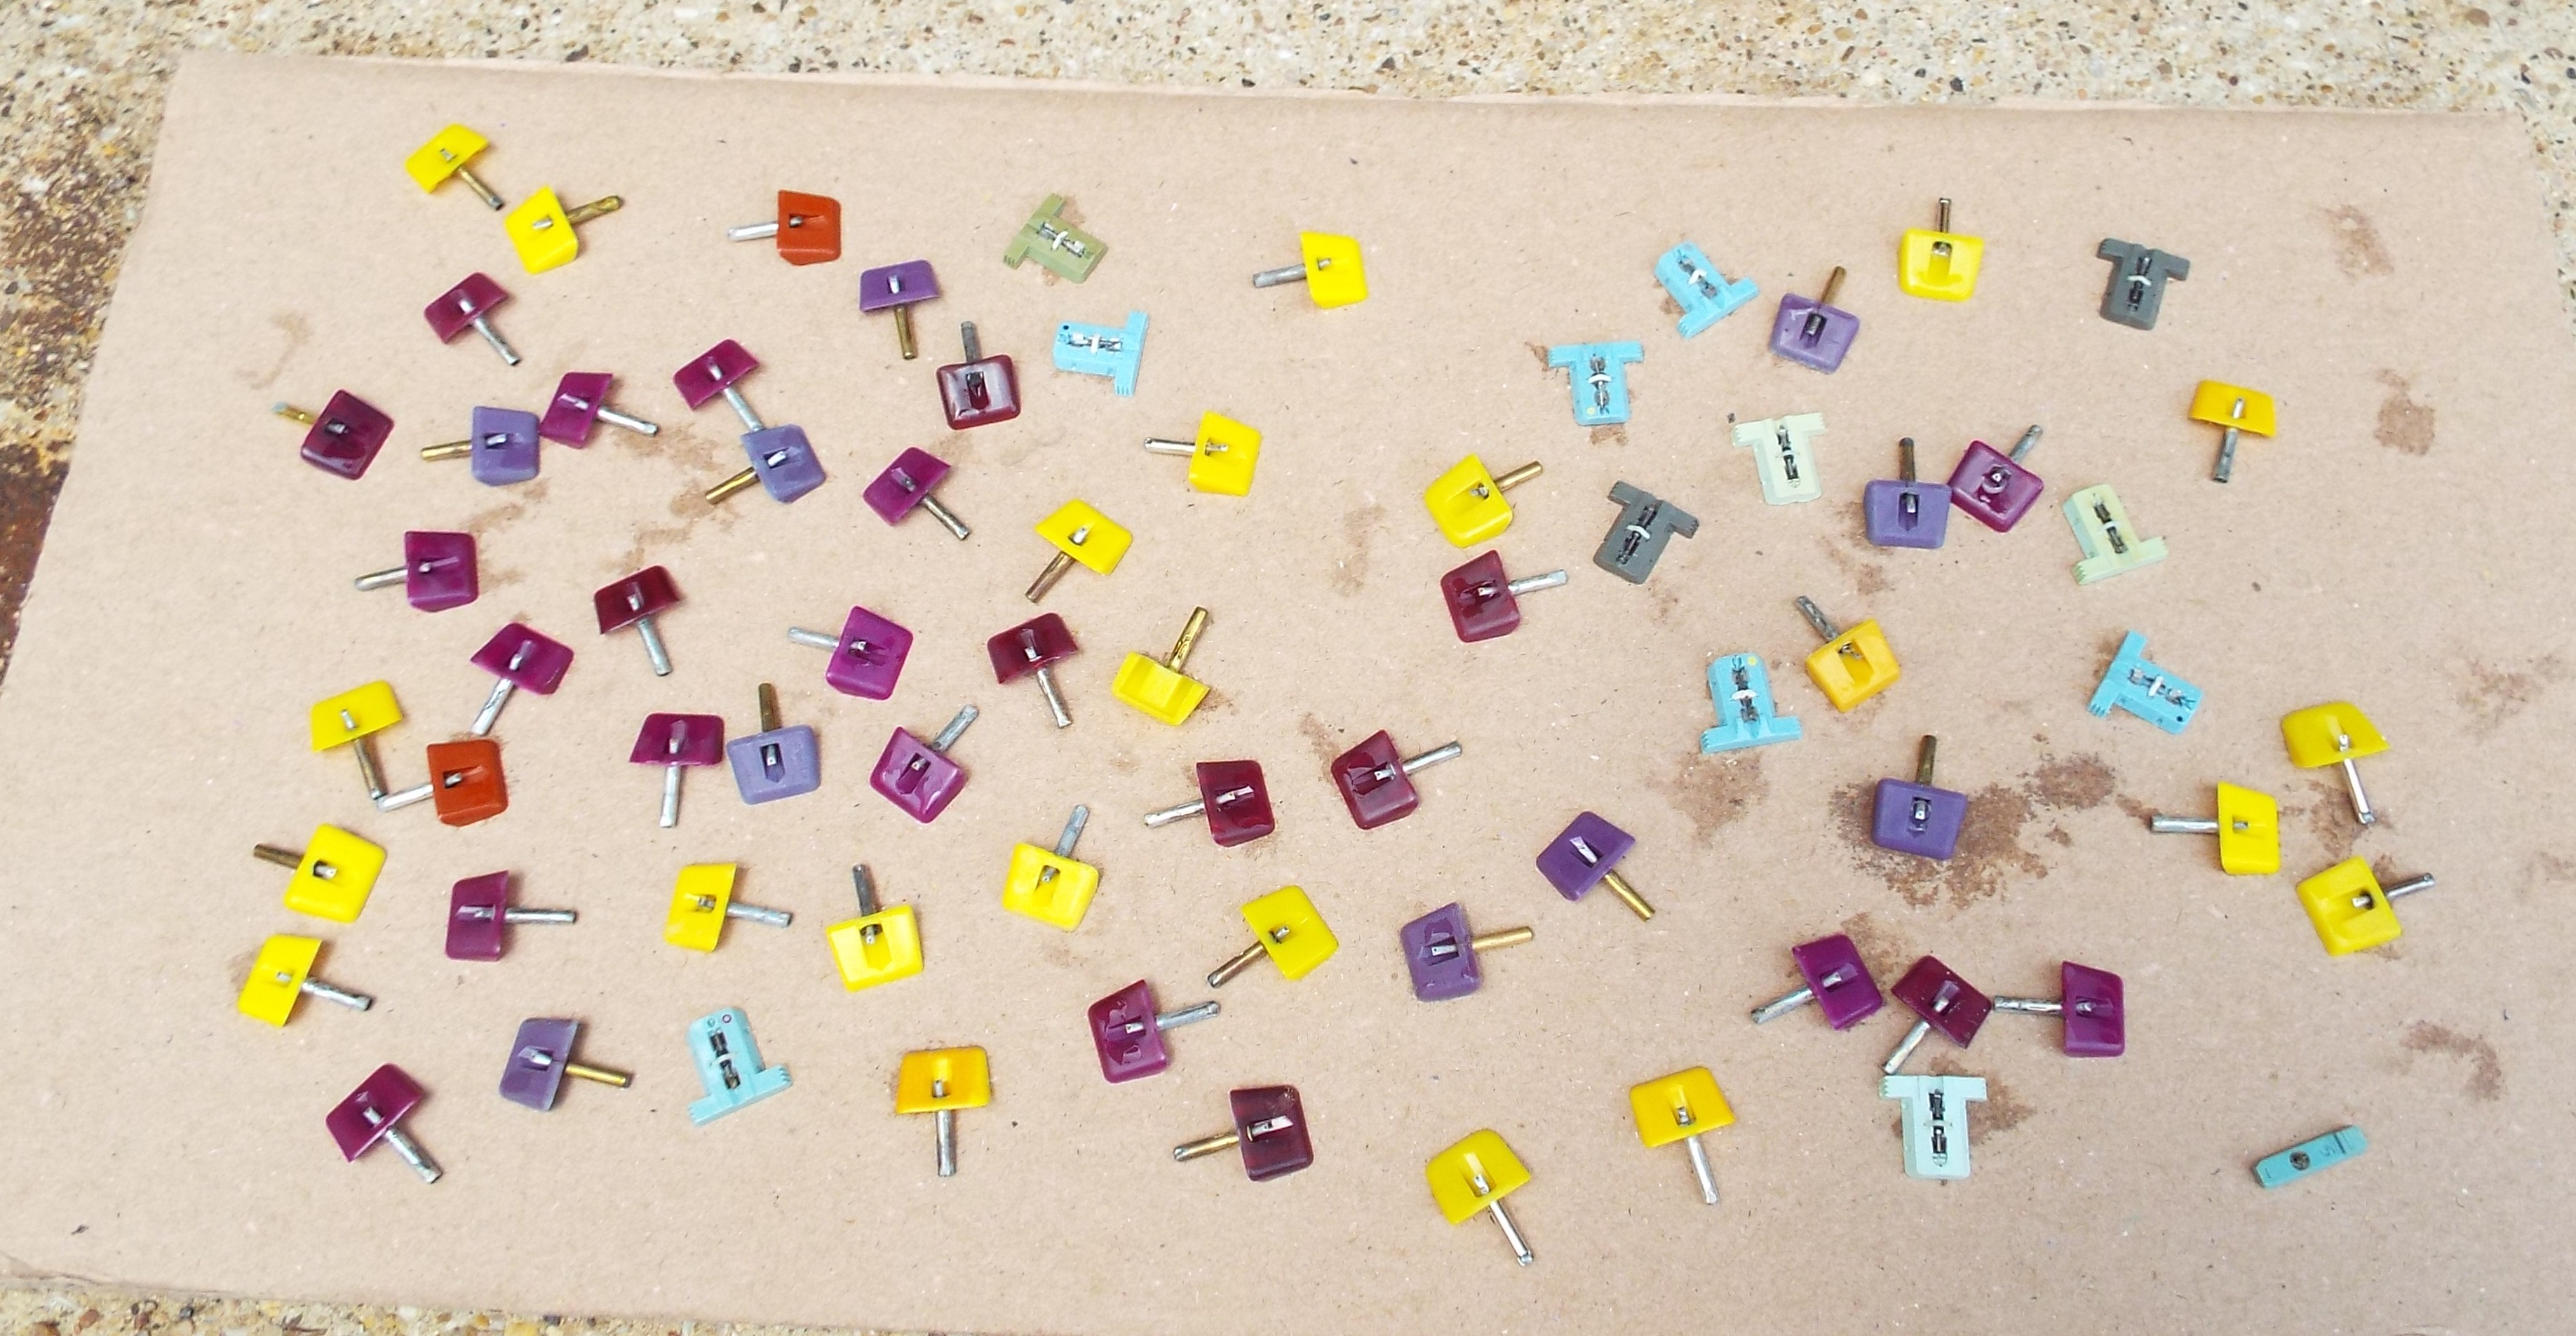
Before I broke for lunch I took all the used needles I have and dumped them into a small container filled with “Mean Green”. A couple hours later after finishing with the SMC1 for the day I took them inside to the sink and gently scrubbed each one with a toothbrush. One must be careful to brush only in the direction the needle is pointing or up, as I think of it. I rinsed them off in a small colander in fresh water and then spread them out in the Texas sun. I can guarantee all moisture will be sucked out of them despite the horrendous humidity. After they’re dry I’ll inspect them with a jeweler’s loupe to make sure the needle point is conical and not damaged. Next comes the fun part of selecting and playing a record while installing one needle at a time to listen to it and see if it is usable. That will take two or three days as I don’t have the patience to do fifty at a time. I have a ton of the purple sapphire needles. These are all original Pickerings. I imagine the majority of them will be fine. I had sold quite a few used needles before and had so many people that let me know these original used needles sounded waaay better than the new needles now available. I think most operators changed them out fairly often. In home use these needles will last a real long time. Just keep the tonearm pressure about 3 grams.

April 20, 2024

Busy Week

It’s been a busy week. I pulled the SMC3 mechanism, dis-assembled it in a little over an hour, and washed it with Oil Eater and a toothbrush. I removed the tonearm assembly as well. The whole mech looked greasy and dirty .They’re usually the ones that clean up best and this one was no exception. Shiny! The motor mounts could be a problem. They’re wasted. This has the three lead NiDec motor made in Japan rather than the Bodine motor Seeburg used for so long. I have a couple four lead NiDec motors so it seems Bodine fell out of favor for whatever reason. Availability? Pricing? This jukebox is made by Stern so who knows now?

The next day I mounted the new motor coupler into the STD4 test box I got from Johnny Velchoff. It is a well-made item at a much better price than those offered by Victory Glass. I like to see VG get some competition. VG has plenty of great, necessary items but they tend to charge quite a bit for them as well. I cleaned up two 160TM7 tormats I had laying around. One needed the lead cable repaired. This model tormat was used on all the 70’s 80 record jukes from the Bandshell to the STD4. I sold one a couple weeks ago on ebay quickly for a good price and wanted to offer a couple more. My STD4 does not have the pop meter assembly on it so swapping the tormats is much easier. I did some careful marking and started changing them out. Made some 200’s selections, some 100’s selections-good to go. I got them both tested and put the original back in and made sure it still worked and was aligned. Pick your “corners”. Selections 100, 200 and 179, 279. If the mech will pick these four up then the tormat is properly aligned with the record rack.

Thursday I checked the SMC3 mechanism and it was dry so I threw it on the bench and started assembling it. I like to rub any water stains off while working my way around the mech lubricating it as well. I have started removing the mechanism from the rack to get at the lower wheels and make sure they’re lubricated. One of the mechanism wheels was brinnelled so it got replaced. I have many, many small parts for mechanisms having torn so many down. After putting the mech back upright on the track I started oiling the camshaft and then the various levers it operates. I’ll take the motor coupler shaft tower off and lube, then the big fiber gear and turntable. I remounted the tonearm assembly and then the brush cleaning assembly and spent some time with it getting it to operate as freely as possible. I took the clutch assembly apart, the clevis shaft rod was badly stuck. They always are. I used to just hammer these out but after breaking the cast metal on a clutch once I now use a heat gun. A few minutes of applied heat and the rod slides out. Then it and the bore get cleaned with oil soaked Q Tips. Got the clutch done, re-assembled and the clutch adjustments done. The motor was next but the rubber mounts were shot. I have many motor mounts but they’re for Bodine motors and the NiDecs take a different size.

What to do about these motor mounts??? One was floppy-rubbery, the other was like charcoal. Very strange. Lacking any other ideas I took the inner rings off the motor. This is done with a fine edged chisel working around the motor basically forcing the inner ring away from its mount until I could work it off with a large screwdriver. Still kinda puttering while trying to figure out what to do I cleaned up the inner rings on the bench grinder’s wire wheel. I laid one over a Bodine motor mount and got a great surprise! Both inner rings outer diameters match! It’s the inner diameter that’s different. In fact, Victory Glass sells a pair of rings that are supposed to take up this difference. In other words put a spacer ring on and a Bodine mount will fit. The ones I got from VG fit very loosely and I had to epoxy them in place. I do not recommend them unless you want to epoxy them on the motor as I did.

Using an Exacto knife I cut a pair of Bodine mounts off their inner rings by very carefully cutting around the inner metal rings. Now all I had to do was glue them onto the NiDec inner rings. I have been using 3M rubber adhesive but it’s tough to apply and never sure it is really going to stick. It likes sticking to itself better than anything else while being applied except my fingers. I have some stuff called Shoe Goo. Actually got it to glue some soles back on and it worked great. I’ve used it for a few other things and I decided to give it a shot. I liked how I can apply a thick bead around the inner ring as the NiDec inner ring is stepped and there is some space to fill. I pressed the rings in, wiped excessive glue off then left them to dry.

The next day I checked the mounts and they look good! Firm! I took the motor apart to clean and glad I did. Rubber from the mounts was everywhere in it. I used my favorite B12 carb cleaner on the parts and then blew them dry with compressed air. I re-assembled the motor and tapped the new mounts on and got the motor mounted. The last thing I always do is clean all the mech switches and solder the motor and trip coil wires back. I’ll do this when I get the record rack finished and mounted. I did decide to paint the record rack flat black. It has some light corrosion markings that look like water spots and looks bad. I did three coats on it and left it to dry. Black paint goes with anything.