100 Select Mechanism Alignment
Today’s subject pertains to the 1952 M100C currently under restoration and almost finished. With the WSR5 and credit unit finally gone through it was time to put it all together and see what happens.
I had to wait on some 450 volt capacitors for the receiver before I could use it. While waiting I put the receiver on the bench, unsoldered the five wires to the credit unit and removed it from the receiver. It is so much easier to work on with it sitting on the bench than wrestling the receiver with the credit unit attached. The 1954 R was the first to have a removable credit unit with the wires going to an Amphenol plug. Guess they got tired of wrestling with the receiver too. After this year model all credit units were self contained and one merely had to loosen four screws and unplug it.
The credit unit cancel coil plunger operated very freely. It rotates the credit wheel underneath. I cleaned and adjusted all switches. A couple were out of whack and their contacts pitted. A light oiling finished it. The coin instructions showed one play for a dime and three plays for a quarter and I wanted the credit unit to match. It took an inordinate amount of time to make sure which coil wires went where. It’s then a simple matter of moving the coin coils around to the proper spot.
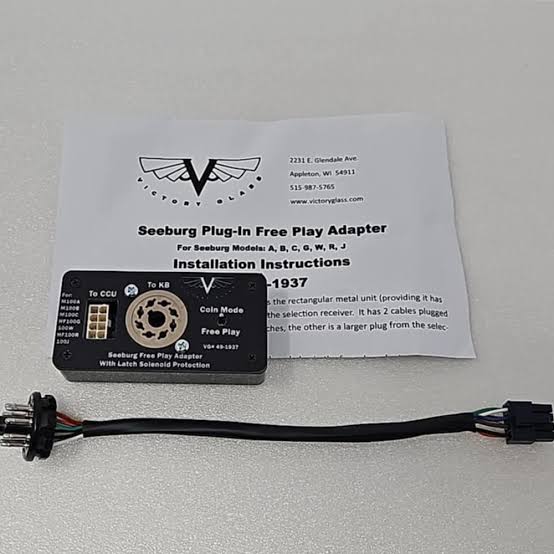
I bought a free play adapter from Victory Glass for this jukebox. It is so neat! It plugs into the credit unit and the electrical selector plugs into it. It is selectable between free play and coin play. When in free play the green Credit glass is lit but the latch solenoid doesn’t pull in until either a number or letter is pressed. If someone should press one and leave it at that this unit will, after a timeout, release the latch bar solenoid preventing it from burning up. I have seen totally burned latch bar solenoids which are just another wire wound coil. This free play/ coin play unit will give the juke’s new owner a couple of neat options.
I put the receiver, pinbank, and electrical selector in the box and connected all the cabling. First thing I usually do is manually pull A1 and A2, or the A side and B side pins respectively to check alignment of the pinbank to the record rack. I didn’t this time. I was curious to see how the electrical selector and credit unit would act. I selected D7. The mechanism picked up D5, one space to the left on the A side. Now I manually pulled my two pins, rolled the mech down to A2, manually tripped the mech and put it into Play position. The contact block was way off. It was also all the way to one side. I fiddled with it and aligned it to the pinbank. Still played one spot off. The play position indicator was also off. In fact everything was off but it looked OK. I called it a day and went off to mull this over.
In a regular or usual mech/rack alignment I put the mech somewhere in the middle of the rack, trip the mechanism manually and roll the turntable until the pickup arm, also called the transfer or contact arm has just entered the rack. I can peer into the record slot from the front while moving the rack to get the pickup arm centered in its slot. This generally suffices. Not this time.
The next day after thinking this over I selected a perfectly straight unwarped record and put it in the rack roughly in the middle. I rolled the mech to it. Manually put the mech into Play position and eyeballed it. The record was not centered in the slot. So I loosened the rack and moved it a little bit to get the record dead center in its slot. Now the mechanism and rack are truly aligned.
I pulled the A1 pin which is the first pin all the way to the left, one of the “corners”, and put the mechanism into Play position. What I wanted to check now was the alignment of the lift arm assembly to the rack. I rolled the turntable until the lift arm was just entering the rack and sure enough it was too far to one side. Now came the fun part. I had to take the pop meter hood and slide bar for the Play indicator off and then the pinbank. Since I had true alignment with the rack I very carefully marked its position on the base and then removed it. This all had to be done to get to the two screws holding the lift arm assembly in place. Once they are loosened there is a tiny bit of left/right play to align the arm. This is Transfer Arm 1 adjustment in the manual. It also rarely has to be done which is why I do a simple alignment in the first place. This is one of a handful of times I’ve had to do this alignment in all the years. I even had to break out the impact screwdriver to get one of the screws loose. They are straight slot which can be easy to strip. With the impact screwdriver, a foot long 3/8″ extension and a large screwdriver blade the screw came loose after one pop. It took awhile to get the lift arm to stay in place while I tightened the two screws. Every time I got the first screw nearly tight it would move the lift arm assembly a bit. I wanted a perfect alignment. And as I said, it took awhile but I got it. Now the lift arm is aligned to the rack.
I put the pinbank back on the rack aligned with the marks I had made. With the mechanism still at A1 Play position it was an easy matter to loosen the cradle holding the contact block and center it between the two pulled pins. I double check by manually pushing the cancel coil up until it hits the pin. It was hitting the A1 pin dead center. Now the contact block is aligned.
Time for the truth! I selected K9 and K10, the other “corners” and anxiously watched to see what happened. Success! The mechanism stopped at K9 and selected the record. Once rejected the mech came back and picked up K10. I selected the other two “corners”, A1 and A2 again. And yes!!! Both were picked up and pins cancelled. When the “corner” pins are aligned the rest of the rack can’t help but be aligned. I re-installed the play indicator bar and pop meter hood and made a small adjustment to the play indicator block to get the light aligned with the proper selection. All is well. It is a good day in the Seeburg Life.
Incidentally this juke has performed flawlessly coining up, making selections, and general running and playing. I’ve only played a handful of records through all the way. The trip switch helper spring needed a tiny adjustment and so far that’s been it. I have a very good feeling about this box. It won’t be long before the cosmetics get put back on and I have a fully assembled jukebox.

